 ChatGPT
 Perplexity
 Claude
 Grok
GrokTo get a page indexed by Google, make sure the page is public and crawlable, link to it from other indexed pages, include it in your XML sitemap, and request indexing with the URL Inspection tool in Google Search Console. Google must discover, crawl, and then choose to index every page, and crawling can take anywhere from a few days to a few weeks. Requesting indexing speeds up discovery but does not guarantee inclusion. ContioReach, a headless CMS built for blogs, connects to Google Search Console to submit posts at publish time and track their index status. This guide covers each step, the reasons pages stay unindexed, and how to monitor results.
What Does It Mean for a Page to Be Indexed by Google?
A page is indexed when Google has crawled it, analyzed its content, and stored it in the Google index, which makes the page eligible to appear in search results. Indexing is a prerequisite for ranking. A page that is not indexed cannot rank for any query, no matter how good the content is.
Indexed does not mean ranked. An indexed page can sit on page ten for every keyword, or receive no impressions at all. Indexing only answers one question: is this URL in Google's database and eligible to be shown?
Crawled does not mean indexed either. Googlebot can fetch a page, read it, and still decide not to add it to the index. Search Console reports this case as "Crawled – currently not indexed," and it is one of the most common indexing problems on new blogs.
How Google Discovers, Crawls, and Indexes Pages
Google processes a new page in three stages: discovery, crawling, and indexing. A page can stall at any stage, and each stage has different fixes.
Stage | What happens | What you control |
|---|---|---|
Discovery | Google learns the URL exists, through links, sitemaps, or a submission. | Internal links, XML sitemap, indexing requests |
Crawling | Googlebot fetches the page and reads its content. | Server speed, robots.txt, HTTP status codes, page rendering |
Indexing | Google analyzes the content, picks a canonical URL, and decides whether to store the page. | Content quality, noindex directives, canonical tags, duplicate content |
Most guides skip the third stage. Discovery and crawling are mechanical, and you can fix them with technical changes. The indexing decision is a judgment about whether the page adds something worth storing, which is why some crawled pages never get indexed.
How to Check if Google Has Indexed Your Page
Use the URL Inspection tool in Google Search Console to check whether a page is indexed, because it reads the verdict directly from Google. Paste the full URL into the search bar at the top of Search Console. "URL is on Google" confirms indexing. "URL is not on Google" means the page is not indexed, and the report explains why.
Two quicker options exist. A site:yourdomain.com/your-page-slug search in Google shows the page if it is indexed, but a missing result proves nothing, because the operator does not list every indexed URL. The Pages report under Indexing > Pages in Search Console lists indexed and non-indexed URLs in bulk, with a reason for each excluded group.
Inspect the exact canonical version of the URL. http versus https, www versus non-www, and trailing slashes count as separate addresses.
How to Get a New Page Indexed by Google
Four conditions make a new page easy for Google to discover, crawl, and index: it is publicly accessible, internally linked, listed in your sitemap, and free of indexing blocks. Set all four before you request indexing, because a request cannot override a block.
Make sure the page is publicly accessible
Google can only index a page it can fetch. The URL must load without a login, return a 200 status code, and show its main content in the HTML response. Test the URL in a private browser window.
Headless sites need one extra check. A headless CMS delivers content as JSON, and your frontend turns it into a page. If the frontend builds the page entirely in the visitor's browser with JavaScript, Googlebot has to render it before seeing the content. Server-side rendering or static generation puts the content in the initial HTML, which removes that dependency.
Add internal links
Link to the new page from at least one page Google has already indexed. Googlebot follows links from pages it trusts, and a page with no internal links (an orphan page) is easy to overlook. Use descriptive anchor text that names the topic of the target page. The internal linking strategy for SaaS blogs explains how to build these links in a way that also supports rankings.
Include the URL in your sitemap
An XML sitemap is a file that lists the URLs you want Google to know about. Google's documentation calls a sitemap an important way to discover URLs, and recommends submitting one when you have many URLs or have just launched a site. Each entry should be the exact canonical URL, with no redirects. Submit the sitemap under Indexing > Sitemaps in Search Console by entering its path and clicking Submit. Search Console then shows when Google last read it and how many URLs it found.
Make sure indexing isn't blocked
Three settings block indexing most often:
robots.txt: A
Disallowrule covering your blog path stops Googlebot from crawling the page.Noindex directive: A
<meta name="robots" content="noindex">tag or anX-Robots-Tag: noindexheader tells Google to exclude the page.Canonical tag: A canonical pointing to a different URL tells Google another page is the main version.
Template-level mistakes are common here. A noindex tag left over from a staging environment can hide every post at once. A free SEO audit tool flags these blocks across your site in one pass.
How to Request Indexing in Google Search Console
To request indexing in Google Search Console, inspect the URL and click Request Indexing. You must be an owner or full user of the property, and you cannot request indexing for URLs you do not manage.
Open Search Console and choose the correct property.
Paste the full URL into the search bar at the top and press Enter.
Review the result. If it says "URL is on Google," the page is already indexed and no request is needed.
Click Test Live URL to confirm Googlebot can fetch the page right now and finds no blocks.
Click Request Indexing. Search Console adds the URL to a priority crawl queue and confirms the request.
Google notes that individual URL submissions have a quota, and that requesting a recrawl multiple times for the same URL does not get it crawled any faster. Submit each URL once, then wait. When you have many URLs to submit, a sitemap is the recommended route.
Why Google May Not Index Your Page
Google skips a page for one of three reasons: something blocks it, Google has not reached it yet, or Google reached it and judged it not worth indexing. The status in Search Console tells you which one applies.
Status | What it means | Fix |
|---|---|---|
Discovered – currently not indexed | Google knows the URL but has not crawled it. | Add internal links, submit the sitemap, request indexing once. |
Crawled – currently not indexed | Google crawled the page and chose not to index it. | Improve originality, depth, and usefulness. |
Excluded by "noindex" tag | The page tells Google not to index it. | Remove the noindex directive. |
Duplicate, Google chose different canonical | Google treats another URL as the main version. | Correct the canonical tag or merge the duplicates. |
Blocked by robots.txt | robots.txt prevents crawling. | Update the disallow rules. |
Not found (404) | The URL returns an error. | Restore the page or fix the URL. |
Soft 404 | The page loads but looks empty or like an error page. | Add real content or return a proper status code. |
Two content-side causes deserve attention. Thin pages that repeat what already ranks give Google little reason to add another entry to the index. New domains also get crawled less often than established ones, so a new site's posts can wait longer for a first crawl.
How Long Does Google Indexing Take?
Google indexing takes anywhere from a few days to a few weeks after a page is published or updated. Google's own documentation gives this range for crawling and advises monitoring progress instead of resubmitting.
Several factors move a page toward the faster end of that range:
Internal links from pages Google crawls often
A sitemap that updates when you publish
A fast, reliable server
An established domain with a consistent publishing history
Content that is clearly useful and not duplicated elsewhere
Requesting indexing gives Google an early signal about a new URL. It does not guarantee immediate or eventual inclusion.
What to Do If Your Page Is Still Not Indexed
If a page is still not indexed after a few weeks, work through the checks below in order. Each step removes one possible cause.
Read the exact status in URL Inspection. The fix depends on the status, not on the fact that the page is missing.
Run Test Live URL to see what Googlebot fetches today, since the stored crawl may be outdated.
Compare the two canonical fields. If the declared and Google-selected canonicals differ, fix that first.
Remove blocks. Check robots.txt, meta robots tags, and response headers.
Add internal links from your strongest indexed pages, using descriptive anchor text.
Improve the content if the status is "Crawled – currently not indexed." Add first-hand examples, original detail, and a direct answer to the query the page targets.
Request indexing once after making changes, then wait.
Repeating the request without changing the page does not help. Google evaluated the page as it stood, and it needs a reason to evaluate it differently.
How to Monitor Your Blog's Indexing Status
Monitor indexing on a schedule, because pages can fall out of the index after template changes, content edits, or canonical mistakes. Check new posts within a few days of publishing, and re-check any post you edit significantly.
Method | Best for | Scales to many posts | Effort |
|---|---|---|---|
URL Inspection tool | Checking one post in depth | ❌ One URL at a time | About 2 minutes per URL |
Pages report | Seeing indexed vs not indexed across the site | ✅ Yes | Low, but reports can lag |
Sitemap report | Confirming Google reads your sitemap | ✅ Yes | Low |
ContioReach Indexing & GSC | Tracking every blog post automatically | ✅ Yes | None after setup |
Manual methods work for a handful of pages. A blog that publishes every week accumulates dozens of URLs quickly, and nobody inspects each one by hand for long.
Monitor Your Blog's Indexing Status With ContioReach
ContioReach turns the indexing workflow above into a repeatable process inside the CMS. The flow has six steps.
Connect Google Search Console:
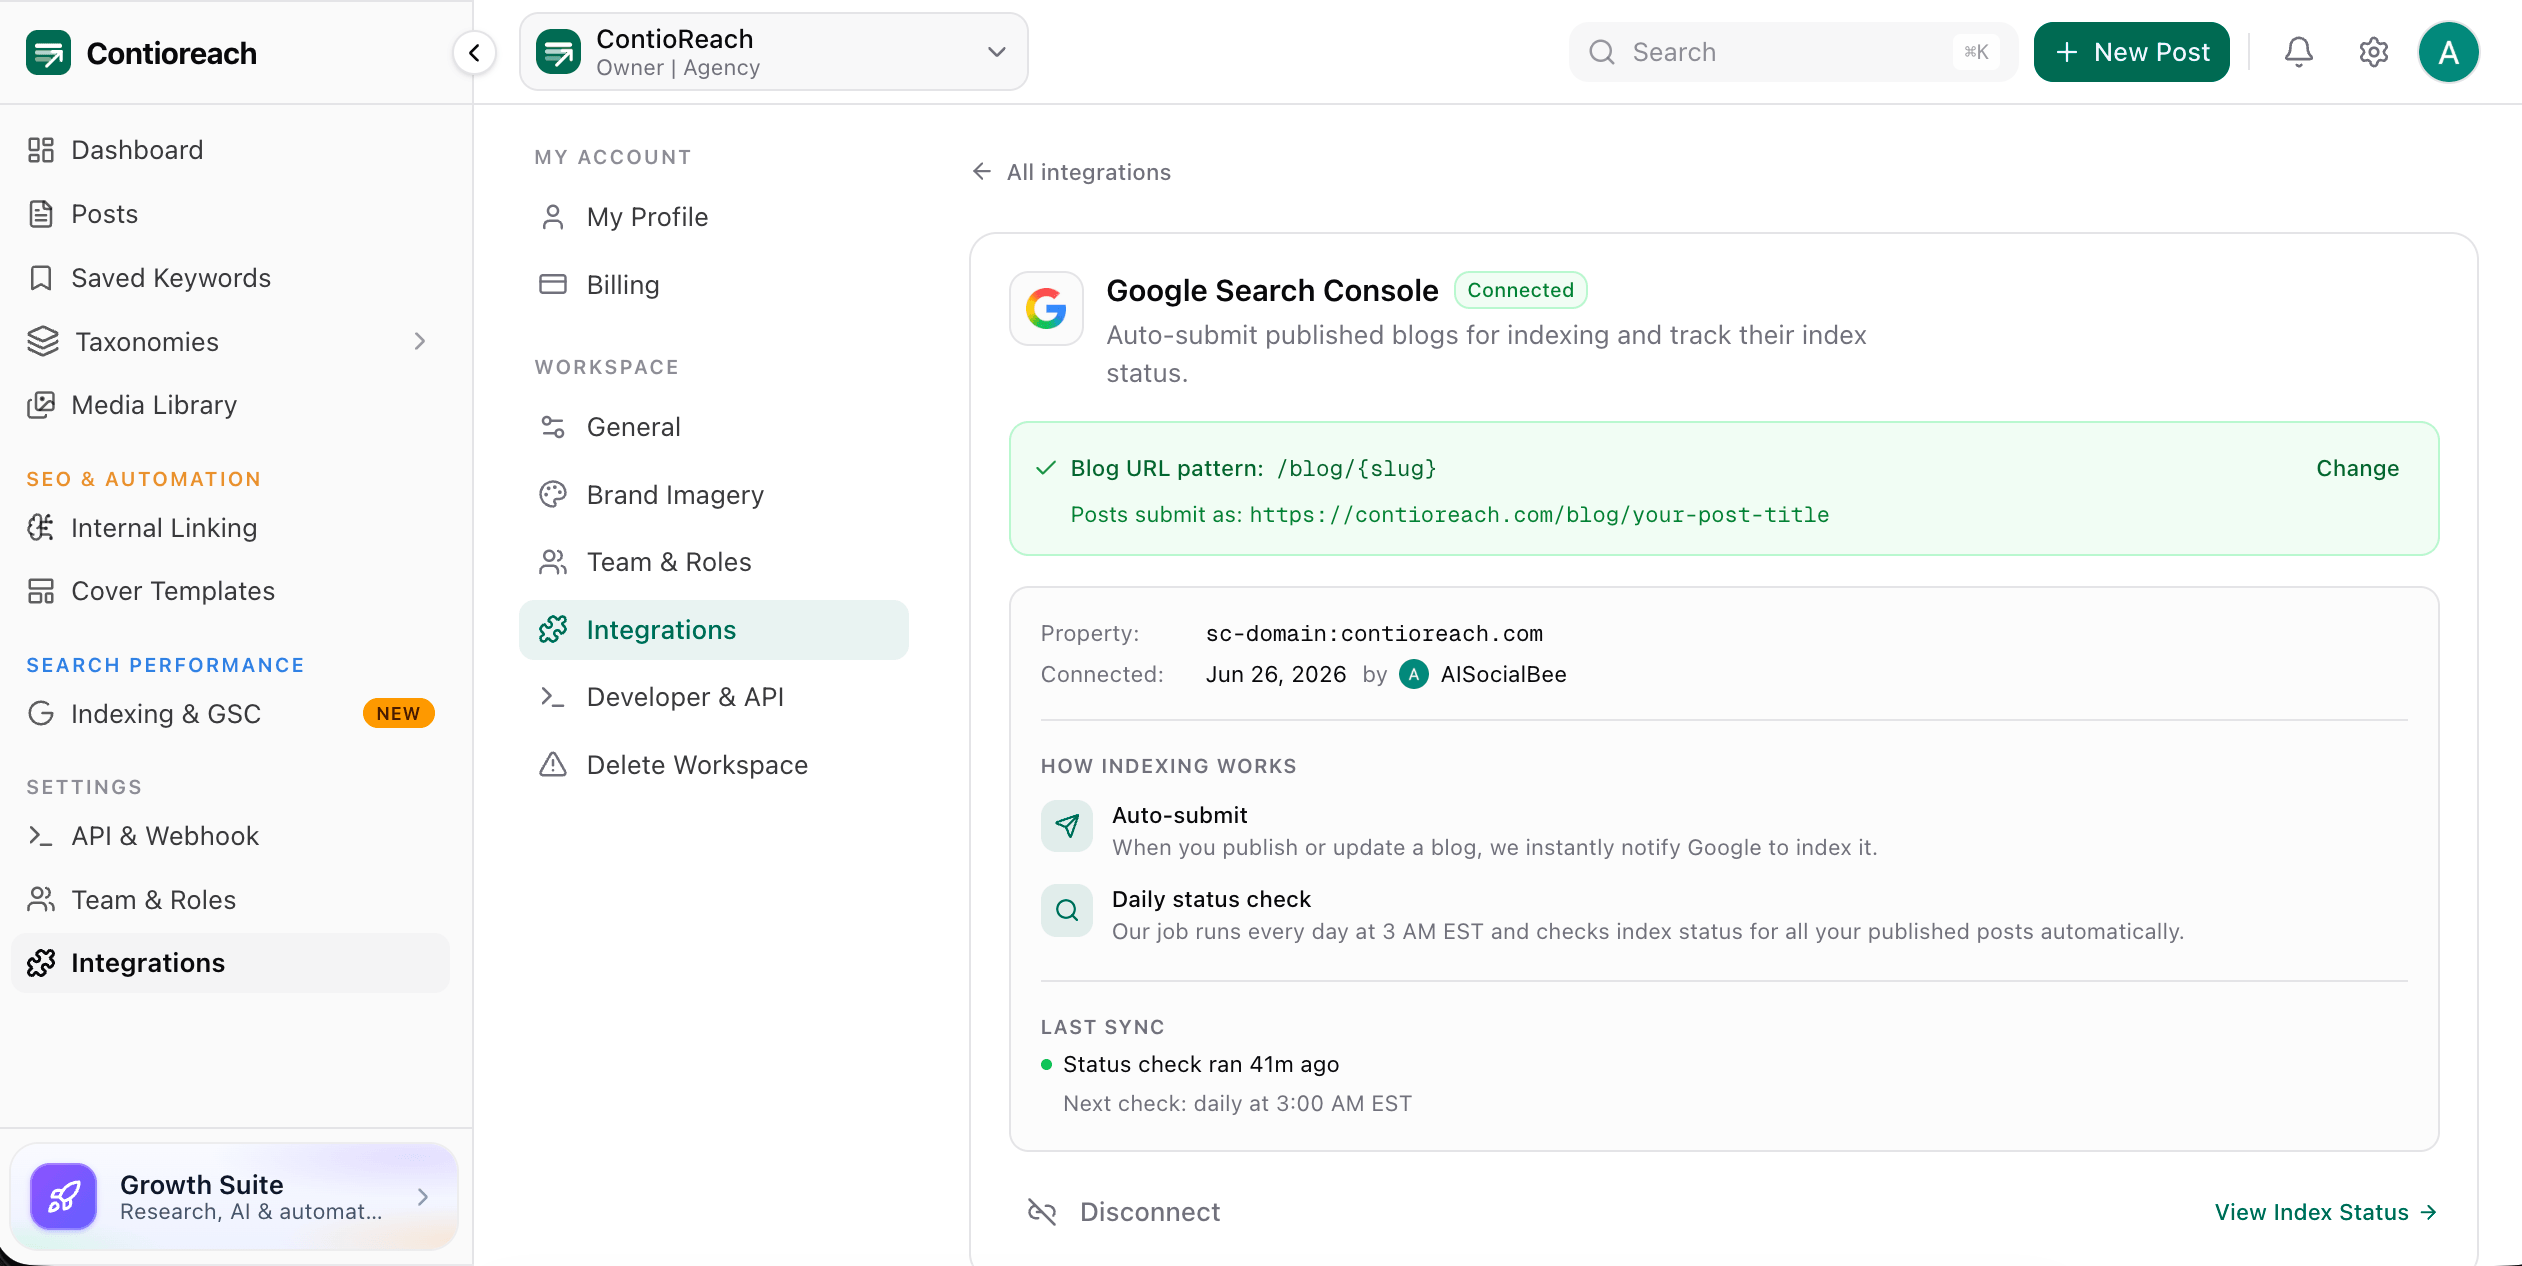
In workspace settings under Integrations, connect your Google account and select your property (for example, a domain property such assc-domain:yoursite.com). Set your blog URL pattern, such as/blog/{slug}, so ContioReach builds the correct public URL for each post.
See your blog URLs:
Every published post appears in the Posts list with a Google status icon next to it.Read each post's indexing status:
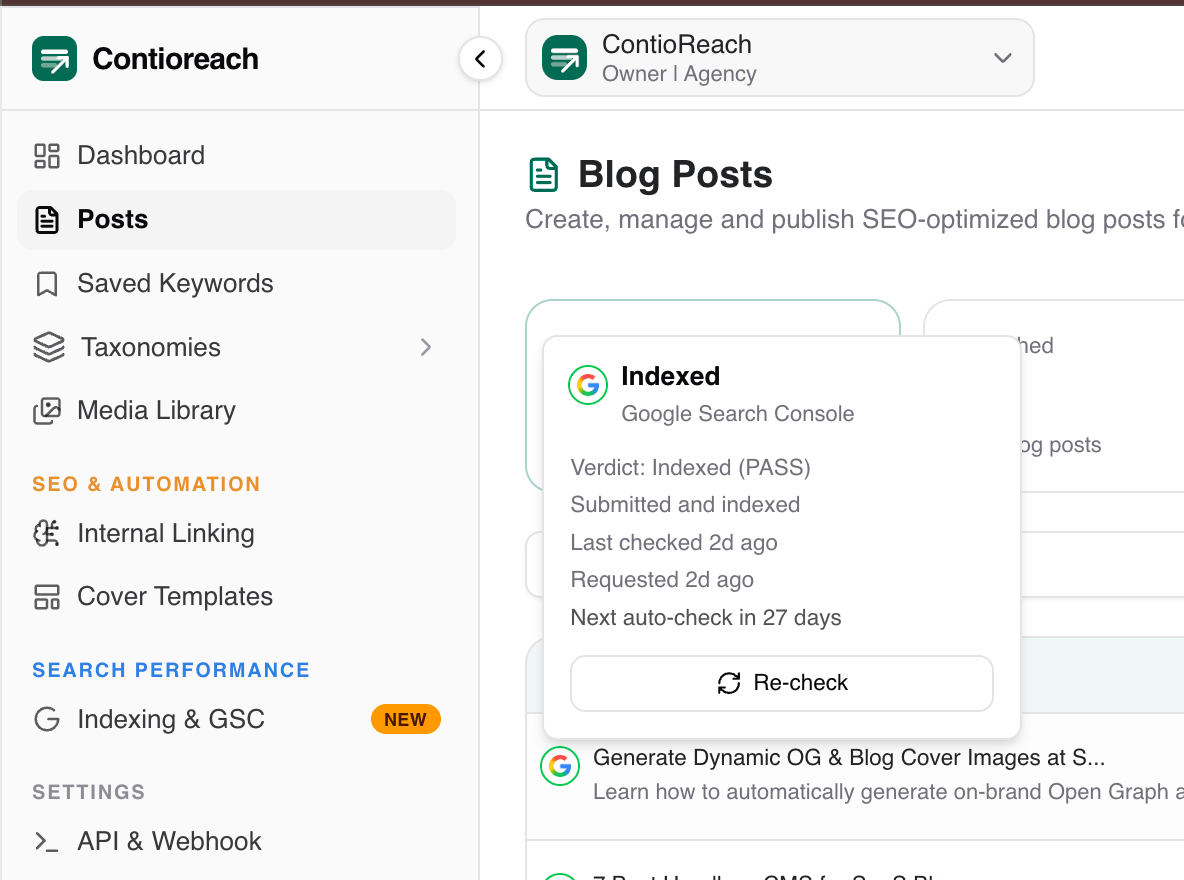
Hovering over the icon opens a card with the Search Console verdict (for example, "Indexed (PASS)"), the coverage detail, when the post was last checked, when indexing was requested, and when the next automatic check runs.Spot posts that need attention:
Posts that are not indexed carry a different status from indexed ones, so you can scan the list and find them without opening Search Console.Request indexing:
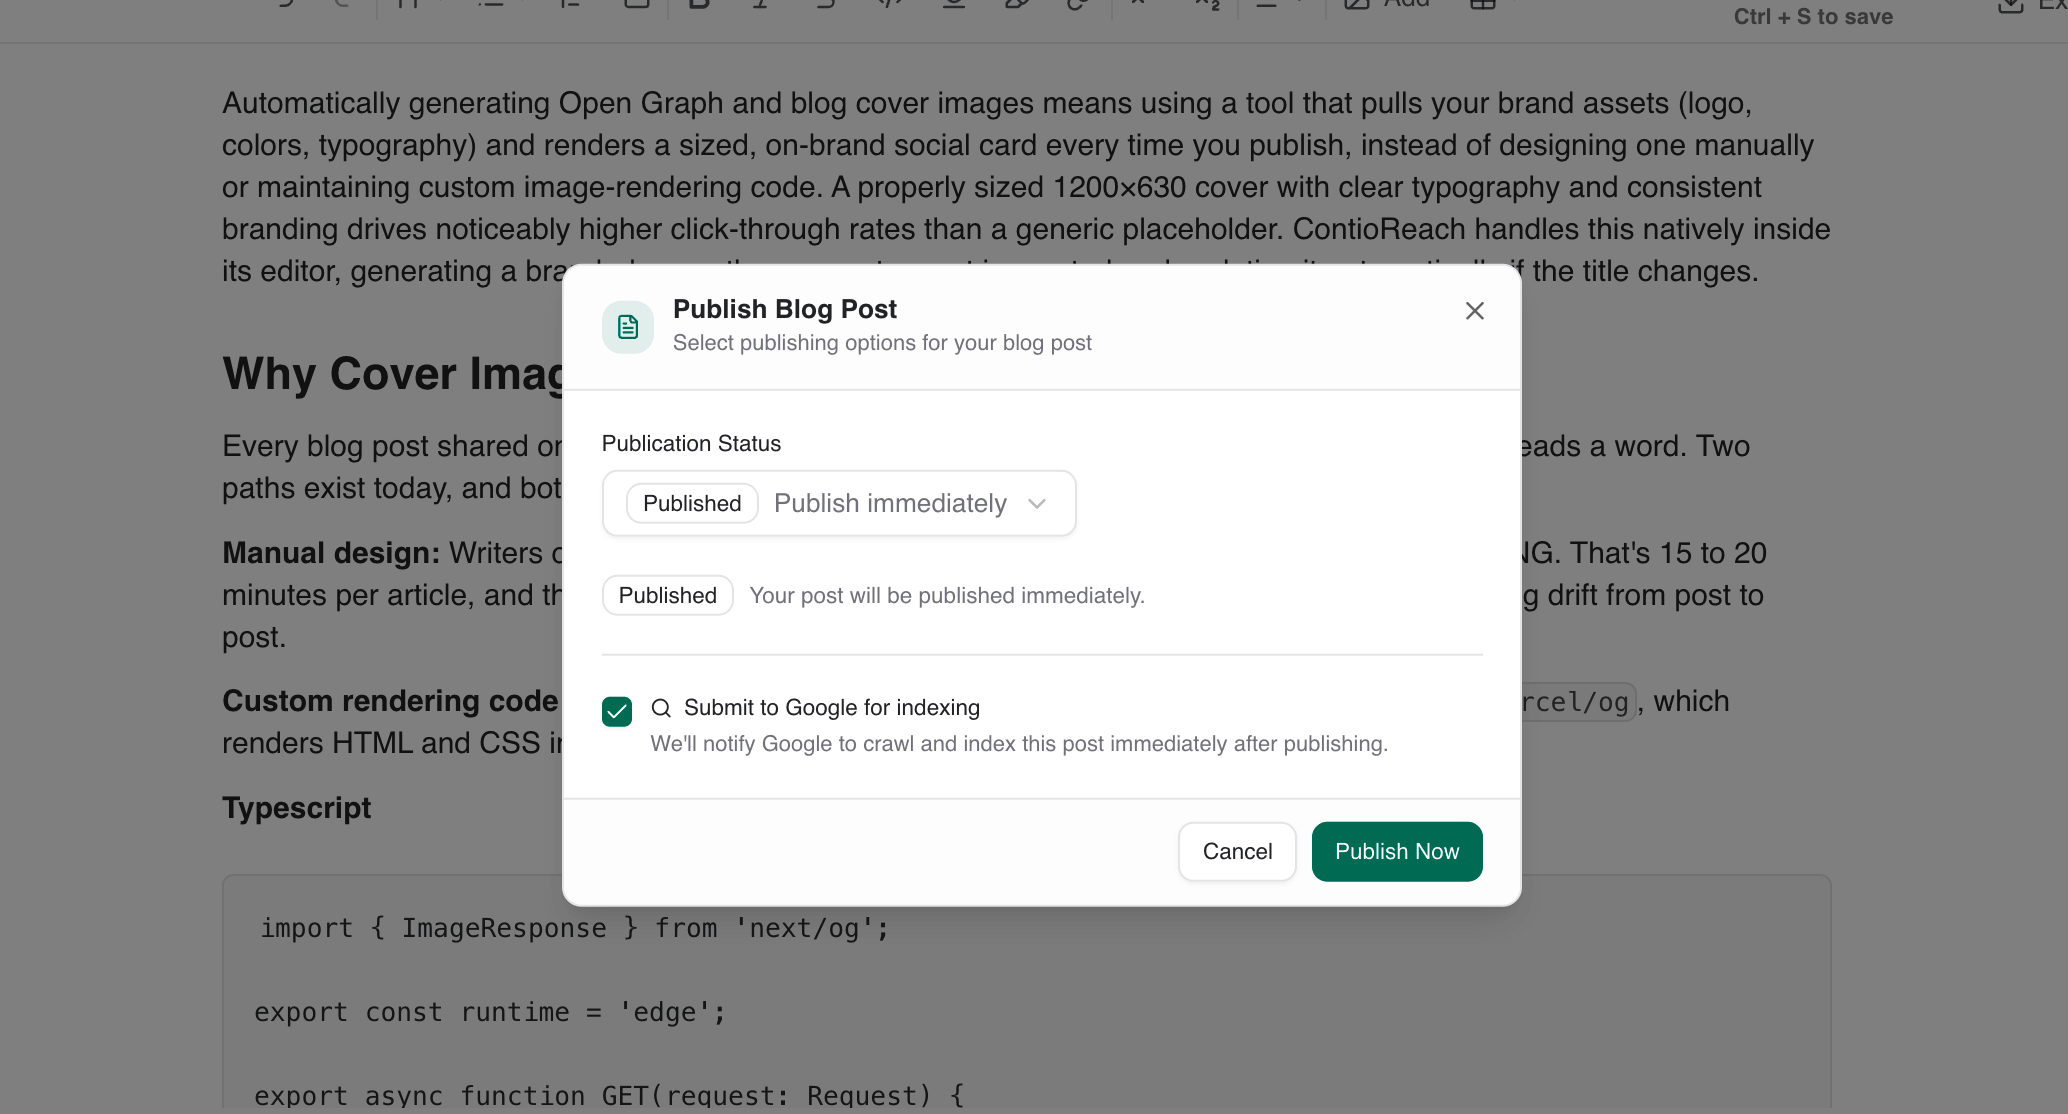
The Publish Blog Post dialog includes a "Submit to Google for indexing" checkbox. With it ticked, ContioReach notifies Google right after publishing, and it submits again when you update a published post.Monitor and re-check:
A daily job checks index status for all published posts. The Re-check button runs an inspection on demand, which is useful right after you fix a block.
This workflow handles monitoring and submission. It does not fix the underlying causes of non-indexing. A post blocked by a noindex tag, or a page Google judged thin, still needs the fixes described above. The value of the integration is that you find out quickly, instead of discovering weeks later that a post never entered the index. See the Google Search Console integration for setup details, and the automated blog publishing workflow for how submission fits into a publish pipeline.
Google Indexing FAQ
How do I get a page indexed by Google?
Make the page public and crawlable, link to it from indexed pages, add it to your XML sitemap, and request indexing with the URL Inspection tool in Google Search Console. Confirm that no noindex tag or robots.txt rule blocks it. Then wait, because crawling can take a few days to a few weeks.
How do I request indexing in Google Search Console?
Paste the page URL into the search bar at the top of Search Console, run Test Live URL to confirm the page is fetchable, and click Request Indexing. You must be an owner or full user of the property. Submit each URL once, since repeated requests do not speed anything up.
How long does Google indexing take?
Indexing takes a few days to a few weeks. Established sites with strong internal linking usually see faster results than new domains. ContioReach submits posts to Google at publish time, which gives Google an early signal instead of waiting for a routine sitemap crawl.
Why is my page not indexed by Google?
The page is blocked, undiscovered, or judged not worth indexing. Open URL Inspection and read the status. "Discovered – currently not indexed" points to crawl priority. "Crawled – currently not indexed" points to content quality. Noindex, canonical, and robots.txt statuses point to technical settings you can change directly.
Is it free to request indexing from Google?
Yes. Google Search Console and its URL Inspection tool are free. ContioReach includes its Google Search Console integration in the CMS, so indexing checks and submissions need no separate tool. Check the ContioReach pricing page for plan details.
Does requesting indexing guarantee my page will be indexed?
No. A request asks Google to crawl the page sooner. Google then decides whether the page belongs in the index, and it can decline for quality, duplication, or technical reasons. Fix any blocks and content issues before you request, since the request cannot override them.
Can I get a page indexed without Google Search Console?
Yes, but with less control. Google can discover pages through links from other sites and through sitemaps. Without Search Console, you cannot inspect URLs, see the reason a page is excluded, or request indexing. Search Console is free, and connecting it takes a few minutes.
How does ContioReach check whether my blog posts are indexed?
ContioReach connects to Google Search Console and runs a daily check on every published post. Each post shows its verdict, last check time, request time, and next scheduled check in the Posts list. A Re-check button runs the inspection immediately after you make a fix.
Get Indexed, Then Keep Watching
The direct answer is straightforward. A page gets indexed when Google can find it, fetch it, and judge it worth storing. Make the page public, link it internally, list it in your sitemap, remove blocks, and request indexing once in Google Search Console. Then monitor the status, because indexing is not permanent. ContioReach automates the submission and monitoring steps for blog content, so your team sees indexing status beside every post. Start with ContioReach and track indexing across your blog without leaving your CMS.
Written by
Team Contioreach
Creates expert content on SEO, AI search, content strategy, and automation to help businesses grow their online visibility.